It's raymarching march!
In preparation for my computer graphics exam next week, I decided to take an excursion to the low-level side of things: ray marching ASCII graphics of rotating spheres!
Multiple ways to create an image
Generally, there are two different ways to generate an image with a computer:
- Object-order rendering (rasterization)
- Image-order rendering (ray tracing, ray marching)
Object-order rendering is the technique commonly used for both games and visualizations alike: APIs like OpenGL allow you to draw objects made up from primitives like triangles piece by piece. The primitives are projected into 2D, depth-tests are made to ensure objects behind another one are invisible and finally, they are coloured in pixel by pixel. This way, you “rasterize” a 3D-object onto your screen.
Image-order rendering takes a different approach, however: you do not fill the screen object after object, but pixel after pixel. So instead of looking at a triangle and figuring out where to draw it on the screen, you take a single pixel of the screen and figure out what colour it might be. As light rays emitted by a light source hit an object, some of them are reflected into the eye or camera of the observer. Since lots of light rays are emitted but never actually hit the camera, it is much more efficient to trace them backwards: send out “rays” from the camera, determine where they hit an object and then see if the path to the light source is occluded. This technique can allow for much more realistic graphics, seen with modern technology like the NVIDIA RTX GPUs that employ a mixture of object-order and image-order rendering.
While these techniques can be used to produce high-quality images, in this article we will try to render an image made up of ASCII characters into the terminal. It can be easily adapted to output image files, though.
Raymarching introduction
In this article, we will focus on image-order rendering, and ray marching in particular. Where ray tracing consists of a scene made up of primitives whose intersections with the ray are calculated using “fixed” algorithms, ray marching represents the scene implicitly by a surface distance function. It maps a point in space to a lower limit of the distance to the nearest object in the scene – similar to radar, it tells us how much further we can go without hitting anything.
Figure 1 illustrates the process of ray marching. We start with the ray r, evaluate the surface distance function (SDF) at that position and obtain the red perimeter. We continue to walk in the ray direction until we intersect the perimeter and evaluate the SDF again. In this case, we did not hit any object and the ray will continue until eternity (or floating-point overflow, in this case).
Figure 2 shows what happens if we near a surface: the perimeter will get smaller and smaller, until it hits a certain threshold and we consider it a collision with the surface.
If we shoot a ray for each pixel on the screen (our ASCII character in a terminal), we should be able to render a 3D scene. Let us jump into the code!
Coding it all together
I will be using C with a little bit of C++ mixed in, running on a Linux machine. You will find the complete source at the bottom of this page.
The implementation is scattered across these methods:
void raymarch();
float sdf(struct vec3);
char shade(struct vec3);
The first method will do the actual ray marching: sending out a ray and following it until it hits an object. It then calls shade with the surface position as a parameter, which will calculate how well illuminated that spot is. sdf is the surface distance function that is needed for ray traversal.
Data structures
First, we will need a data structure to store points in 3D space. vec3 is its name, short for three-dimensional vector:
struct vec3 {
    float x;
    float y;
    float z;
Pretty standard so far. Now we add some operators so we can add and subtract them and methods to determine their length:
    float length() {
        return sqrt(x*x + y*y + z*z);
    }

    void normalize() {
        float vectorlength = length();
        x = x / vectorlength; y = y / vectorlength; z = z / vectorlength;
    }

    struct vec3 operator*(float fac) {
        struct vec3 r;
        r.x = x * fac; r.y = y * fac; r.z = z * fac;
        return r;
    }

    struct vec3 operator+(struct vec3 other) {
        struct vec3 r;
        r.x = x +other.x; r.y = y +other.y; r.z = z + other.z;
        return r;
    }
    struct vec3 operator-(struct vec3 other) {
        struct vec3 r;
        r.x = x - other.x; r.y = y - other.y; r.z = z - other.z;
        return r;
    }

};
normalize can be used to preserve the direction of the vector and make sure it has a length of 1.
Display
As a display, we use a frame buffer that stores the value of each pixel. A pixel can be one of seven ASCII characters
defined in the string pixels.
#include <math.h>
#include <unistd.h>
#include <time.h>
#define WIDTH 80
#define HEIGHT 40
static char framebuffer[HEIGHT * WIDTH];

const int npixels = 7;
const char *pixels = " .:+|0#";
Raymarching
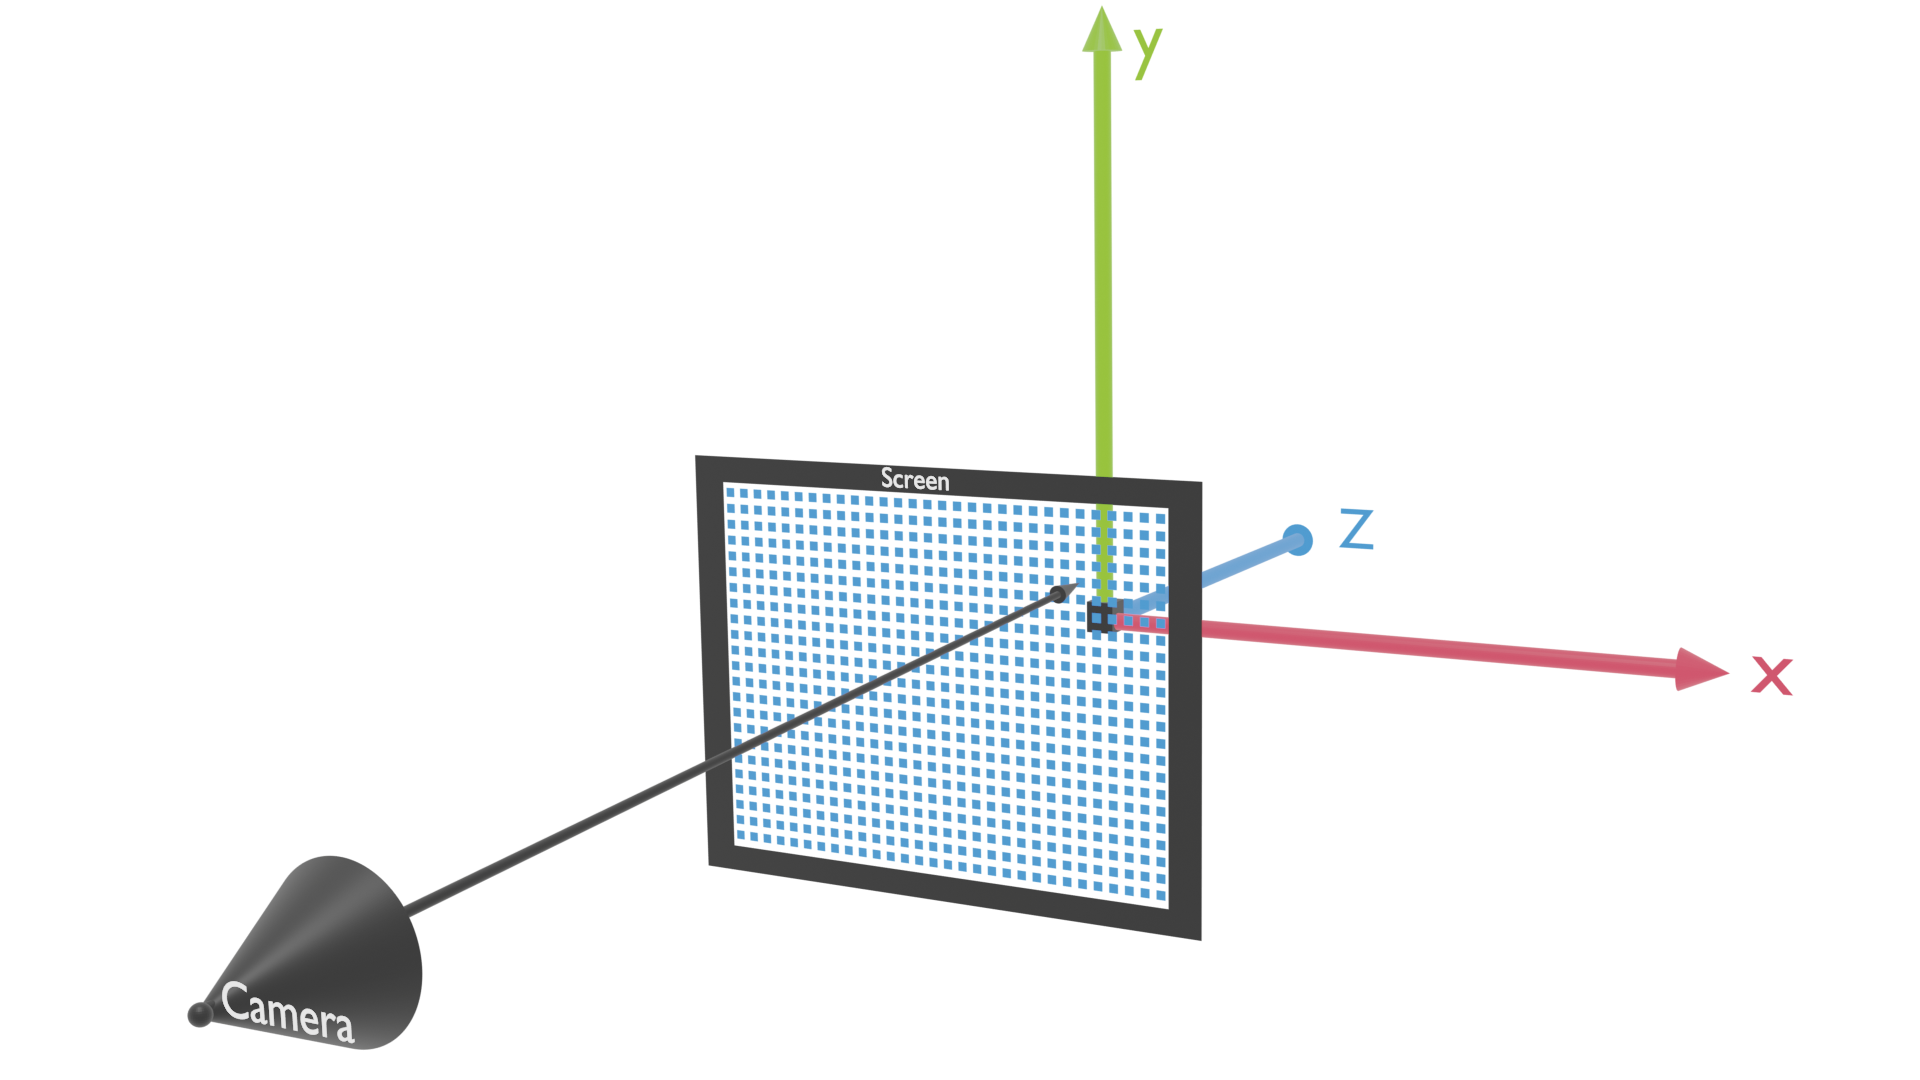
Next up, we will implement the function that does the actual raymarching: it iterates over each xy-coordinate and shoots
off a ray. The camera will be at position (0, 0, -3), so that is where our ray will start. We position the screen a
little bit in front of the camera and send a ray from the cameras origin “through” the pixel target (see figure 3). We
must correct the y-coordinate a bit, because the screen is usually not a perfect square.
void raymarch() {
    for (int y = 0; y < HEIGHT; y++) {
        for (int x = 0; x < WIDTH; x++) {
            struct vec3 pos = {0.0, 0.0, -3.0};
            struct vec3 target = {
                x  / (float) WIDTH - 0.5f,
                (y / (float) HEIGHT - 0.5f) * (HEIGHT / (float) WIDTH) * 1.5f,
                -1.5f
            };

            struct vec3 ray = target - pos;
            ray.normalize();
The ray must be normalized: later, we want to multiply it by the sdf to get the new position pos. If
the length of the ray would not be 1, we might end up overshooting and landing inside the object.
After the ray is initialized, we can start marching in its direction. We employ another for loop here, the 3rd nested
for-loop! You might begin to understand why ray marching is deemed computationally expensive. We also store the pixel
value pxl the ray returned and initialize it with the first pixel value (which is a space). dist will
hold the value of the SDF and tells us how far out the object lies. max is an upper limit on how far we will
march.
            char pxl = pixels[0];
            float dist;
            float max = 9999.0f;
            for (int i = 0; i < 15000; i++) {
                if (fabs(pos.x) > max
                		|| fabs(pos.y) > max
                		|| fabs(pos.z) > max)
                	break;
fabs is the absolute value of a floating-point number. As you can see, if a ray exceeds the max value in either
dimension, we drop it and colour that pixel dark. Otherwise, we need to update the position: we evaluate the surface
distance function and walk exactly that far into the direction of our ray:
                dist = sdf(pos);
                if (dist < 1e-6) {
                    pxl = shade(pos);
                    break;
                }

                pos = pos + ray * dist;
            } // end for (i)
If the distance is less than 0.000001, we will assume we have hit the surface and call the shade function to colour
that pixel accordingly. In that case, we can also exit the inner for loop, since we have already hit an object.
Otherwise, the for loop will continue to march, until the ray is either out of bounds or the maximum iteration count of
15000 is hit.
All that is left to do is writing the pixel value into the frame buffer, and returning from the function:
            framebuffer[y * WIDTH + x] = pxl;
        } // end for(x)
    } // end for(y)
} // end raymarch()
And that concludes the ray marching part of our program! Pretty short, considering it actually renders a 3D scene from scratch.
The SDF
Even though the raymarch() function is complete, we have not talked once about the object we are going to render. For
starters, we will keep it simple: a simple sphere at position (0,0,0) with a radius of 0.2 will suffice.

The surface distance function must tell us the distance to the nearest point on the surface. It will be positive for
points outside of the object, negative for points inside the object and approximately zero on the surface. How might we
calculate the SDF for a given position pos? Simple: we subtract the sphere centre from the position and calculate the
length of that vector. If we subtract the radius r from that value, we will obtain the distance of position to the
surface. And that is exactly how the sdf function is implemented:
float sdf(struct vec3 pos) {
	struct vec3 center = {0.0, 0.0, 0.0};

	return (pos - center).length() - 0.2;
}
Shading
For a quick test, we will use the simplest shading function imaginable: it simply colours all surface points with a “dark” character (#):
char shade(struct vec3 pos) {
	return pixels[npixels - 1];
}
I/O
This section is a bit boring: it contains the code for printing the frame buffer and clearing the screen. Feel free to skip over it.
// Terminal clear sequence
const char *cls_seq = "\e[1;1H\e[2J";

void cls() {
    write(0, cls_seq, 10);
}

void printfb() {
    char *fb = framebuffer;
    char nl = '\n';
    cls();
    for (int y = 0; y < HEIGHT; y++) {
        write(1, fb, WIDTH);
        write(1, &nl, 1);
        fb += WIDTH;

    }
}

int main() {
    for (int i = 0; i < WIDTH * HEIGHT; i++)
        framebuffer[i] = ' ';

    while(true) {
        raymarch();
        printfb();
        sleep(1);
    }
}
In the main function, we clear the frame buffer and then enter an endless loop of ray marching and drawing the frame buffer.
Compiling and running
Quite a bit of code there. Let us run it!
$ g++ raymarcher1.cpp -lm -o raymarcher
$ ./raymarcher


                            #####
                         ###########
                        #############
                       ###############
                       ###############
                      #################
                       ###############
                       ###############
                        #############
                         ###########
                            #####
Lo and behold! It actually renders a sphere to the screen. It looks a bit boring, but that will change soon.
Refining our program
Timing
The first thing we are going to add is a timer, to spit out frames at the correct moment and to animate the sphere. To do that, we need to add the following to the beginning of our file:
double t = 0.0;
Then we will change the while loop in the main function:
    while(true) {
        double last_frame = t;
        raymarch();
        printfb();
        frame++;
        do {
            struct timespec time;
            clock_gettime(CLOCK_REALTIME, &time);
            t = time.tv_sec + time.tv_nsec * 1e-9;
        } while ((t - last_frame) < 1.0 / 60.0);
    }
The last bit will wait for a 1/60th of a second before redrawing the screen.
Shading
We kind of took a shortcut when writing the shade function: it does not include any lighting and assigns the same
brightness to each point on the sphere. To spice things up a bit, we are going to introduce a light source:
char shade(struct vec3 pos) {
    struct vec3 L = {
    		50.0 * sin(t),
    		20.0,
    		50.0 * cos(t)
    };
    L.normalize();
This will move our light source continuously in a circle above our sphere.
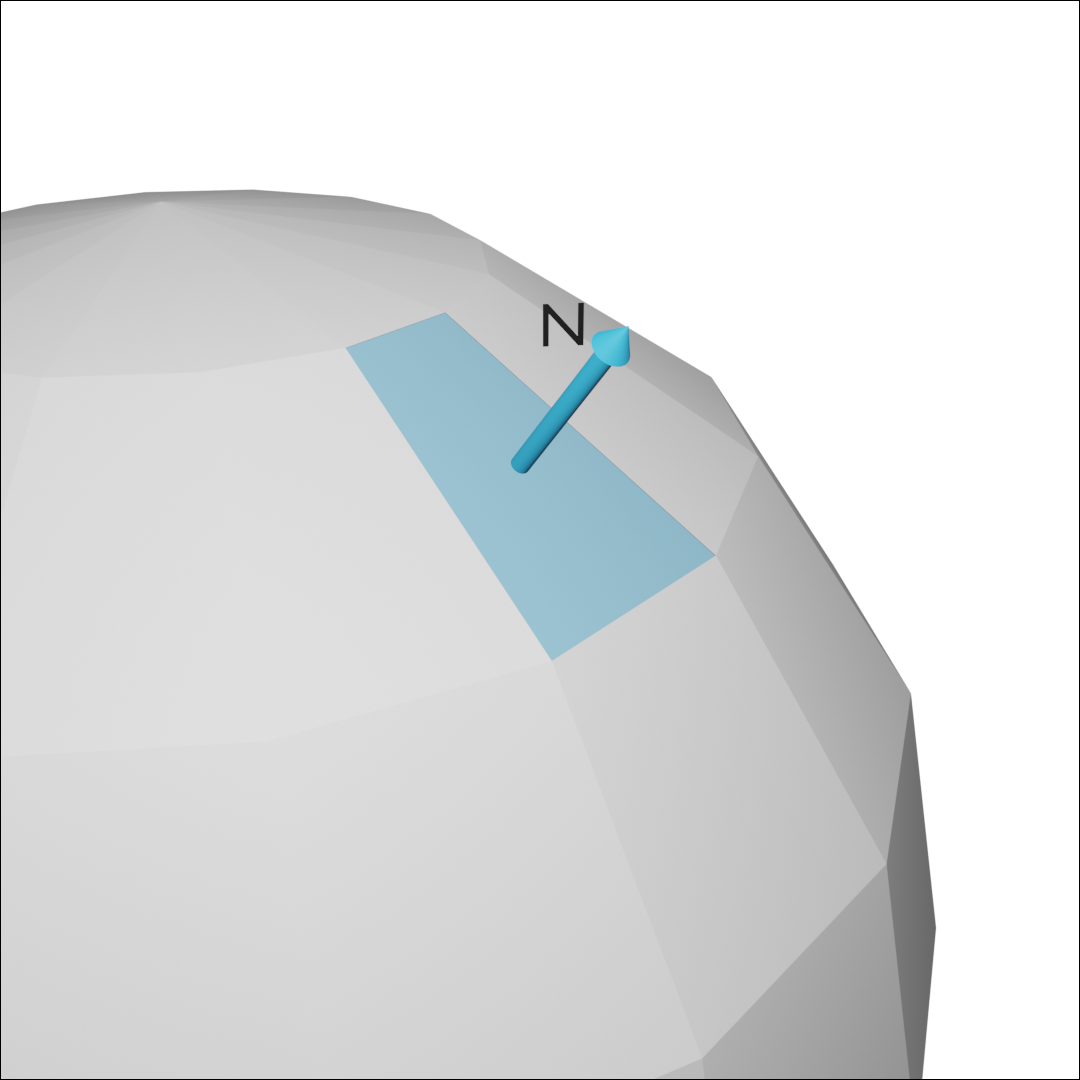
Next, we are going to calculate the so-called normal: it is the vector that defines the orientation of the surface. It is exactly orthogonal to the tangential plane of our surface. In traditional rendering techniques (like object-based ordering), the normal would be part of the geometry we are rendering. In our case, with an SDF, we take a different path: if the normal points away from our surface point, that means it is going to be the direction where SDF grows most quickly. Calculus tells us that this direction is called the gradient and can be determined by deriving the function. So that is what we are going to do:
	float dt = 1e-6;
	float current_val = sdf(pos);

	struct vec3 x = {pos.x + dt, pos.y, pos.z};
	float dx = sdf(x) - current_val;

	struct vec3 y = {pos.x, pos.y + dt, pos.z};
	float dy = sdf(y) - current_val;

	struct vec3 z = {pos.x, pos.y, pos.z + dt};
	float dz = sdf(z) - current_val;

	struct vec3 N; // N for normal
	N.x = (dx - pos.x) / dt;
	N.y = (dy - pos.y) / dt;
	N.z = (dz - pos.z) / dt;
Next up, we have to handle a case where the normal calculations fail. In that case, we abort the shading process and simply return a dark pixel:
	if (N.length() < 1e-9) {
		return pixels[0];
	}

	N.normalize();
A normal would not be a normal if it was not normalized, of course! Now that we have obtained the normal and the light vector, we can do basic Phong shading: in the seventies, smart scientists figured out an easy way to do a pretty good approximation of the lightness. They came up with the following formula:
Lightness = kambient · cambient + kdiffuse · cdiffuse · (L · N) + kspecular · (RL · V)n · cspecular
It consists of three parts:
- ambient lighting, which is light that does not originate from one particular light source but just floats around the room. Its strength is given by the coefficient kambient and its color is cambient, which is an RGB vector with 3 components.
- diffuse lighting, which is the light from a light source that is scattered when hitting the object’s surface. (L · N) is the dot product between the light vector and the normal vector, and since both have length 1, it is the cosine of the angle between the two. Since the cosine is close to one when the angle is small, the diffuse lighting is brighter when the light source shines from directly above the surface than if it is just above the “horizon”.
- specular lighting, which is a bright spot resulting from reflection. RL is the reflection vector.
We are going to ignore ambient and specular lighting and focus on just diffuse lighting. Since we do not have any coloured light, we can safely ignore the cdiffuse component. So all that is left is the term (L · N) — we just need to calculate the dot product between light vector and the normal vector:
	float diffuse = L.x * N.x + L.y * N.y + L.z * N.z;
	diffuse = (diffuse + 1.0) / 2.0 * npixels;
Since the dot product returns the cosine, which is in the range from -1 to 1, we add 1 and divide it by two so it is between 0 and 1. Then we multiply by the number of different pixel values. In the next bit, we are going to return the pixel with the closest brightness level:
	return pixels[(int) floor(diffuse) % npixels];
}
And that’s it. Compile it, run it, and see how much a little bit of shading can improve your graphics, even if running in a terminal!
Conclusion
In just 128 lines of code, we were able to implement a ray marcher with basic Phong-shading and ASCII output. We were able to apply some multi-dimensional calculus (normal calculation) and geometry (SDF). A lot of things can be adapted and extended, especially since SDFs provide a pretty compact way of expressing scenes. Inigo Quilez has assembled a comprehensive page of different SDFs.
Links & Downloads
- raymarcher1.cpp (unshaded)
- raymarcher2.cpp (diffuse shading)
- raymarcher2 (ELF 64-bit)
- An AALib port with dithering and more characters submitted by a HackerNews reader. On Wayland I had to pass -driver curses as argument to get it running.
- Ray marching tutorial by jamie wong
- A ray marcher implemented in GLSL